
How to build and use Microsoft Forms...

Microsoft provided us with many useful tools and applications, and Microsoft form is one of the finest apps we can use to capture surveys, polls and feedback from the customers or your end-users. It is a component of office 365, released in 2016. It is not only fairly simple to create a data input form with Microsoft, but also it is user-friendly and easy to navigate, which requires little technical proficiency to make a highly dynamic and creative form. Since it is a part of Microsoft 365, it will be free for you to use if you have active Microsoft 365 subscription.

As we all know, data has become an essential part of any process or function in a small or big organization, and the Microsoft form application comes in handy when we need a tool to collect any kind of data from the end-users or customers. 

Here I will demonstrate how to build a Microsoft form and manage data by using it.

1. Firstly, you need to log in to your Microsoft account if you are not already. (Please note Microsoft Form is a web-based app and works on the network) and look for the ‘Forms’ under Microsoft applications. Or you can directly sign in to the Microsoft forms through https://forms.microsoft.com/.

2. Once you are logged in, it will show you the list of forms you have created and the 'New Form' option on the top (Refer to the below screenshot).

3. Now click on 'New Form' button. On the next page, you need to give a title to your form. Here we are creating a sample form for the demonstration, and naming it Sample Collection Form. You can also add the picture to your form and add a description to make it more coherent for the audience ( Refer to the below screenshot).


You can change the theme color for this form using Theme option on the top.

4. After everything is done, click on 'Add new' to add a series of queries for your responders 
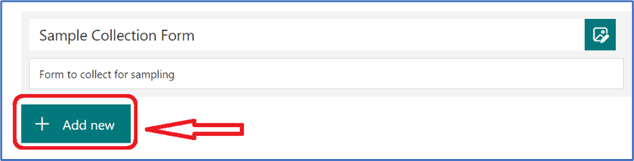
5. Once you click on 'Add New' button, a window will pop up where you need to determine which type of questionnaires you want your target users to input. You will have many sorts of question types (Refer to the below screenshot)

Here are the examples for all the types of questions:


There is more type of questionnaires you can add to your forms, such as Date, Ranking, File upload, Net promoter, and Sections. Add any of them as per your necessity. 

Further, you must have noticed a 'Required' toggle in the above images which is available under each question-type, you can make any particular or all questions compulsory for the responders. 

6. After you added all the required questions and details. Click on the 'Preview' button on the top to see how’s your form looks. It has the option to see the form preview on Computer and mobile

7. Once you feel it looks good, you can click on 'Share' button on the right top of the screen and copy the URL to share with your audience. 

All set. You can see all the replies on the same page and get a thorough analytics report under the Responses tab.

Comments

Popular posts from this blog

How to add CC recipients in Mail-Merge

Please refer How to do a Mail-Merge in MS Office to pursue this article further. I am going to explain the steps to send personalized emails to a huge group of receipts by looping people\groups in an email CC. Though, there is no straightforward technique for doing so. But there is one trick that functions like a charm. The trick is that we will create a new outlook rule which indicates whenever we send an email with the specific subject line, it will automatically include certain group\people in the CC. Steps to create this new rule in Outlook 1. Go to Rules in the menu bar and select Manage Rules & Alerts. 2. Then a dialogue box will appear. Click on the New Rule and choose Apply rule on messages I send in the following wizard (refer to the below screenshot) and Click Next. 3. In the subsequent window, tick the first line, which says with specific words in the subject line in Step 1 and click on a specific word from Step 2 (Refer to the below screenshot). 4. On clicking ...

These instructions will allow you to save password-protected PDF attachments from Gmail to Google Drive.

Discover how to automatically save PDF attachments that require a password from Gmail to Google Drive and transform them into unencrypted versions that can be accessed conveniently washout a password. Financial statements are frequently sent by financial institutions as password-protected PDF files, including banks and credit card firms. Passwords formed from personal information, like your birthdate, Social Security number, or a special mix of details, are frequently used in these attachments. To access password-protected PDF files, you must enter the password each time. While Google Chrome allows for the permanent removal of passwords from PDFs, the manual and time-consuming nature of the process can be burdensome, especially if you have a substantial number of such attachments in your Gmail inbox. Imagine how easy it would be to have a solution that downloads all of your password-protected PDF attachments from Gmail straight to Google Drive and converts them into PDF files that aren...

All you need to know about Service now ITSM Standard & ITSM Professional

ServiceNow offers two primary editions for its IT Service Management (ITSM) solution: ITSM Standard and ITSM Professional. Here's an explanation of each edition: ITSM Standard: ITSM Standard is the foundational edition of ServiceNow's ITSM offering. It provides essential ITSM capabilities to streamline service delivery and improve IT support processes. Key features of ITSM Standard include: Incident Management: Allows IT teams to log, track, and resolve incidents efficiently, minimizing service disruptions and reducing downtime. Problem Management : Helps identify the root causes of recurring incidents and facilitates proactive problem resolution to prevent future disruptions. Change Management: Enables IT teams to plan, assess, and implement changes in a controlled manner, reducing risks and maintaining service stability. Service Catalog : Provides a self-service portal where users can request IT services, track their requests, and access knowledge articles to find answers t...